Hi guys.
Well, I was 3/4 of the way through a blog about butternut squash ravioli. Then blogger randomly deleted everything and Auto-Saved before I could react. After 3 hours of work. Yup, the internet ate my blog. I'm going to bed.
See you next week,
Heather
Tuesday, October 26, 2010
Monday, October 25, 2010
Hot Buttered Bourbon and Cider
I've been talking about beer a lot lately and it's probably not going to stop anytime soon. At least not until next summer when the apartment starts feeling like it's on top of a lake of fire. I can't help it; it's just so interesting. Brewing beer is perfect practice for being a father. Those little yeast cells are relying on me and me alone to create the perfect environment to survive and flourish. Occasionally I'll catch myself staring at the bubbling airlock. I'm thinking about how the beer will turn out and contemplating my creepy parental attachment to the yeast.
I'll probably be back to beer next week, but this week--as a palate cleanser--I thought I would return to the world of cocktails. Seasonal cocktails to be specific. It's hard not to get taken in by all the pumpkins, squash and apples that dominate the farmer's market this time of year. Traditionally there are so many of them that we have to resort to bobbing for apples, carving pumpkins and stuffing squash down our pants...we all did that as a kid, right?
Heather and I enjoy buying local cider in the fall. When enjoying it as an alcoholic beverage, we heat it up in the microwave and add a splash of rum to it--warms the heart and soul. But this time around I wanted to do something more elaborate and festive. After scouring recipes from various different sources, I decided on one in particular that caught my eye.
Hot Buttered Bourbon and Cider
adapted from Bon Appétit
 -2 cups apple cider
-1/2 cup water
-3 tbsp (packed) golden brown sugar
-4 whole cloves
-1 cinnamon stick
-2 tbsp chilled unsalted butter
-3/4 cup bourbon
-2 1/2 tbsp fresh lemon juice
-ground nutmeg
Bring the first 5 ingredients to simmer in medium saucepan. Remove from heat; cover and let steep 15 minutes. Ad 2 tbsp chilled butter to saucepan; bring to simmer. Remove from heat. Stir in bourbon and lemon juice. Strain into large measuring cup. Divide hot cider among 4 mugs. Garnish with apple slice and cinnamon stick. Sprinkle nutmeg over.
 The one major change from the original recipe is the butter. In addition to the butter contained in the drink itself, it calls for you to essentially garnish the drink by having a quarter teaspoon of butter floating in the drink as you serve it. I told Heather and she said "ewww." My thoughts exactly. Don't get me wrong, butter is great. But people don't want to be reminded of its presence, especially in cocktails. It was in this spirit that it was nixed. Please feel free to try it and leave your thoughts in the comments.
The final result was something a bit different and a bit more savory than I was used to. I've always thought of whiskey as a good winter spirit. It's got a nice sharp bite to it. As for the butter used, I thought that two tablespoons were plenty. Anything more and I'll feel like it's time for a cholesterol test. And I'm told they can be pricey.
I would recommend this as a good drink to make in batches for a party because of the prep work involved. It's the sort of thing that would look great in a punchbowl. Just be careful that no one bobs for apples in it for two reasons. First, the scalding temperature will surely cause severe and disfiguring burns. Second, it's very tasty and your guest may not want to come out, resulting in his eventual drowning. And third, it's devastating to see good liquor wasted.
Wednesday, October 20, 2010
Beer Update
 The Belgian Tripel that I have in the fermenter right now is going beautifully so far--not bragging or anything. The temperature is holding at a steady 68°F which is like Disneyland for yeast. The airlock has been steadily bubbling for the last week or so and it's been very encouraging. So encouraging, in fact, that I've decided to bang out another five gallon batch of brew right on the heels of the Tripel.
Heather took a bread making class at Brooklyn Kitchen--an establishment at which Heather and I have taken a handful of classes, some of them beer related--and she suggested that if I were to brew another beer, I could use her 10% class discount to buy ingredients. I said let's do it. It wasn't until that very night that I decided on the beer to brew. I decided on a coffee stout.
 |
| My "stout" |
It didn't occur to me until two nights ago--after I picked up the ingredients for this upcoming batch--that the grains need to be milled or crushed. Every time I get my ingredients from Keystone, they prep the grains and blend them together. Part of that preparation includes milling the grains so that the hot water can get access to the starch inside the grain and turn it into fermentable sugar. Brooklyn Kitchen will not automatically do that for you, which explains the pale color and the low Original Gravity (1.040 as opposed to the 1.050 that the recipe estimated). I felt (feel) like an idiot, but I am happy that it's no longer a mystery. The code is cracked and I'm excited to move forward.
As luck would have it, Heather left her phone at Brooklyn Kitchen after her class. She called them the next day and had them set it aside to be picked up later. The phone retrieval gave me an excuse to go back, hat in hand, and ask them to let me mill my grains. They were happy to oblige.
 Whenever I get the kits from Keystone Homebrew, they give me the Wyeast smack packs of yeast that inflate when you burst the little bag inside. When I go to Brooklyn Kitchen and pick out my own stuff, I get the White Labs vial of Irish Ale Yeast. There's really not a great deal of difference between the two, but the vial makes me feel like more of a scientist. The smack pack--while effective--makes me feel like I'm about to treat a sports injury. Hopefully with my properly cracked grain, I'll be able to give the yeast a little more fermentable sugar to feed on.
I am very excited to return to beer brewing after this long hot summer. I spent a good chunk of yesterday cleaning used bottles with my bottle brush and removing their labels with steel wool, which works leaps and bounds better than the scouring side of our dish sponge. Heather is slowly getting used to the amassing of bottles in the apartment and has been putting up with it like a saint.

Bottling day for the Tripel is a week from today and I'll be able to drink it two weeks after that. The recipe suggests that the beer could benefit from a secondary fermentation in a glass carboy. Unfortunately, I don't own a glass carboy so I'll be skipping that step. As far as I've come with beer brewing, there is still so far to go. I suppose that's one of the things that keeps me interested; there's always going to be more complex and elaborate things you can do to make your beer better.
Monday, October 18, 2010
Risotto with Kale and Toasted Pumpkin Seeds
There are foods out there that are legendary for being challenges. Dishes that have a number of very precise steps, dishes with chemical reactions, and if one step goes astray the whole dish collapses on you. This is why I've never attempted a soufflé. Or anything that requires a sheet of gelatin as an ingredient. For the longest time I have avoided a staple of Italian cooking, the risotto.
Let's start with the fact that I just kinda suck at cooking rice. After the like 17th pot of either soggy or dry rice, I finally just broke down and bought a rice cooker. Risotto, however, is even more complicated. The scientific principal of regular rice is simple. Cook with water (or stock), let liquid absorb into rice, done. The types of rice used for risotto (most notably Arborio) has a kernel surrounded by a starch known as amlopectin. When this starch dissolves it makes the rices all soft and sticky, creating the creamy goodness risotto is known for. Sticking the rice into boiling water is not enough to create this effect, however. It can only be achieved by toasting the kernels, then stirring in liquid, a bit at a time, and letting it absorb before adding the next batch. This process can take anywhere between 20 and 30 minutes and you must stir constantly the entire time. I have been intimidated by the process, and more then that, I have been lazy. Man has invented stand mixers, hand mixers, and a variety of blenders all so we don't have to stir. "Stir constantly"... what is this, the 16th century?
A few nights ago I was crouched in front of my fridge, staring down a large bunch of kale. This leaf has been increasingly popping up in my culinary research, especially for a plant I was unable to identify two years ago. I needed a side dish for a leg of lamb, and I had purchased this large leafy bunch after being seduced by a sale last week. I took to the Google, and discovered the perfect recipe. It involved risotto. I may have walked away, except for one ingredient. Toasted pumpkin seeds. Suddenly this dish was seasonal. Suddenly I had a use for the bag of pumpkin seeds I bought for last week's recipe. I took a deep breath. Alright risotto. You win. It was time to face the challenge.
Not being experienced with this method, I turned to my Italian goddess, Marcella Hazan. Essentials of Classic Italian Cooking offers a solid overview of risotto, walking though the process of creating a flavor base of sauteed onion, toasting the rice, and the gradual adding of liquid, as well the details of cooking the rice al dente (which can end up slightly chalky) to cooking it until it is slightly softer. Risotto "should be tender, but still firm to the bite."
Risotto with Kale and Toasted Pumpkin Seeds
Adapted the tiniest bit from Gourmet magazine
Ingredients:

- 3 1/2 cups water
- 3/4 tsp plus 1/4 tsp sea salt
- 1/2 to 3/4 pounds green kale
- 1 1/4 cups finely chopped onion
- 1 Tbsp olive oil
- 2 Tbsp unsalted butter, separated
- 3 garlic cloves, minced
- 1 1/2 cups (or 10 oz) Arborio rice
- 1/3 cup dry white wine
- 1/2 cup grated Parmigiana-Reggiano
- 1/2 cup toasted pumpkin seeds*
Directions:
Bring broth and water to boil with 3/4 teaspoon of salt in a 3 to 4 quart saucepan. Meanwhile, tear the stems and center ribs from kale and discard. Adding in batches stir kale into broth and simmer, stirring occasionally, until tender, 5 to 10 minutes. Transfer kale with tongs to a large sieve set over a bowl and gently press on greens to extract more liquid. Add liquid in bowl to simmering broth and keep at a bare simmer, covered. Chop kale.

Add wine and simmer, stirring constantly, until absorbed. Stir in 1/2 cup simmering broth and simmer, stirring constantly, until broth is absorbed. Continue simmering and adding broth, about 1/2 cup at a time, stirring constantly and letting each addition be absorbed before adding the next, until rice is creamy-looking and the consistency of a thick soup. Start tasting after 20 minutes, it may take more like 25 minutes to get it where you want it. There will most likely be leftover broth.

* To toast pumpkin seeds: toss 1/2 cup of raw pumpkin seeds with about 1/2 tsp of olive oil and a pinch of salt. Spread on baking sheet and bake at 375°F for 4 to 5 minutes.

This dish was deep, creamy, and exactly how I wanted it to be. The crunchy seeds gave texture to this softer dish. One thing that surprised me was how amazing the risotto was the next day. I'm used to rice that dries out and loses all flavor when stored overnight, this retained its moisture so beautifully and the flavor was deepens with the extra time. I love a dish that produces leftovers for my weekday lunches. And not only can I add this dish to my repertoire, I have opened the door to all risottos, a whole spectrum of dishes I had previously shied away from. Pandora's box has been opened and it's evils have been released...and by evils, I mean deliciousness. Maybe its time to reconsider my stance on the soufflé..

This dish was deep, creamy, and exactly how I wanted it to be. The crunchy seeds gave texture to this softer dish. One thing that surprised me was how amazing the risotto was the next day. I'm used to rice that dries out and loses all flavor when stored overnight, this retained its moisture so beautifully and the flavor was deepens with the extra time. I love a dish that produces leftovers for my weekday lunches. And not only can I add this dish to my repertoire, I have opened the door to all risottos, a whole spectrum of dishes I had previously shied away from. Pandora's box has been opened and it's evils have been released...and by evils, I mean deliciousness. Maybe its time to reconsider my stance on the soufflé..
Wednesday, October 13, 2010
Pumpkin Tea Bread
I am so excited for Fall. Last year we were so slammed at this time with the wedding preparations, I'm really not certain October 2009 actually happened. I'm pretty sure it was just a lie. Last weekend on a visit to PA I wore heavy sweaters, I sat near a bonfire, and I drank cider. It was lovely, but that's not why I'm excited. The pumpkins are back. They have returned to my muffins, my lattes, my Jamba Juice smoothies. They crowd tables at the farmers market and as I drove around last weekend, it seemed every town was involved in some kind of pumpkin gathering, pumpkin patch type pumpkin festival. This is the best time of year. Last year I introduced you to my consuming passion for Pumpkin Ice Cream. This year, I bring you Pumpkin Bread.
 - 1 1/3 cups or 225 g All purpose flour
 Sift together flour, baking powder, baking soda, cinnamon, nutmeg, and cloves into a mixing bowl. Use a wire whisk to make sure they are blended. Set aside.
 Transfer the batter to the loaf pan and smooth the surface with a spatula. Sprinkle evenly with sugar and sprinkle seeds on top. Bake until a cake tester inserted in the center comes out clean, about 1 hour. Let cook in the pan on a wire rack for about 20 minutes, and then invert onto the rack. Turn right side up, and let cool completely. Serve the bread at room temperature. It will keep, well wrapped, at room temperature for 4 days or in the refrigerator for about 1 week.

I was introduced to this bread when someone brought it to an office party. I demanded the name of the bread's creator, swearing I would marry him. It turned out the co-worker responsible was tall, lean, and named Will. I was in luck, I wouldn't even have to have the tux altered. Work Will declined my offer of marriage (I'm sure my Will is relieved) but he did provide me with the recipe which came from a bakery he loved in San Francisco, Tartine. The wonderful thing about this recipe is that it provides both "American" measurements (cups, tablespoons, etc.) and the European style of measuring everything in milliliters and grams. The European way is (A) More precise, a blessing for someone who struggles with the exactness of baking and (B) Gives me an excuse to play with my super fancy awesome digital scale. Win, win.
Quick tip. This recipe require somewhat huge amounts of spices, so check them before you do your shopping. Otherwise your husband (the non-work Will) has to walk to the store at 7pm to buy some. Also, this recipe calls for a large amount of safflower or sunflower oil, which I have found at Whole Foods. If you cannot find these and use something else, please let me know how it goes. If I was a paid test kitchen, I would have tried a loaf with vegetable oil, and maybe one with olive oil. I am not a test kitchen, however, and have a full time job. If you wouldn't mind writing to the New York Times and telling them to hire me, I promise I'll do a much more thorough job of recipe testing. I'll also get to go to cool parties, and then write about them. Doesn't that sound nice? Now come on. Start the viral campaign.
Pumpkin Tea Bread
From Tartine Bakery
Ingredients:

- 1 1/2 teaspoon or 7 ml Baking Powder
- 1/2 tsp or 2 ml Baking Soda
- 1 Tbsp plus 2 tsp or 25 ml Ground Cinnamon
- 2 tsp or 10 ml Ground Nutmeg
- 1/4 tsp or 1 ml Ground Cloves
- 1 cup plus 2 Tbsp or 25 ml Pumpkin Purée
- 1 cup plus 2 Tbsp or 25 ml Pumpkin Purée
- 1 cup or 250 ml Safflower or Sunflower Oil
- 1 1/3 cup or 270 g Sugar
- 3/4 tsp or 4 ml salt
- 3 Large Eggs
- Sugar and pepitas or shelled pumpkin seeds for topping
Directions:
Preheat oven to 325°F. Lightly butter the bottom and sides of a 9" by 5" loaf pan.

In another mixing bowl, beat together pumpkin, oil, sugar, and salt on medium speed until well mixed. Add the eggs one at a time, mixing well after each addition until incorporated before adding the next egg. Scrape down the sides of the bowl, then beat on medium speed for 5 to 10 seconds to make a smooth batter. It should have the consistency of a thick purée.


This bread is delightful. I've brought it to parties or devoured the entire thing myself (followed by a week of guilt and gym attendance). The oil makes it super moist, and it is flavorful and inviting, a perfect thing for a Fall day.
Monday, October 11, 2010
Tripel Preview
Now that the temperature has gone down quite a bit, it looks as if I'm ready to start brewing again. I did some research into which style I should pursue next; porter is something I've wanted to try for a while but it might be a little to similar to my nut brown ale. I thought I should do something interesting, new and challenging. It is in that spirit that I went with a Belgian-style ale.
Belgian ales have a very sharp, distinct taste to them and the yeast plays a very important role in the flavor. The home brew shop had recipes for four different types of Belgian ale--Dubbel, White, Saison and Tripel. I decided to go with the Tripel. The decision was made somewhat arbitrarily. This particular style has one of the highest alcohol contents which wasn't the reason I picked it, but I wanted to try to make something that packs a wallop. The beers I've made up until now have been fairly mild and smooth. It might be a nice change of pace to make something that puts hair on my chest.
A couple of commercial brands of Belgian style beer that I enjoy are Duvel and Chimay. Both have a very strong, heavy flavor to them. They are beers that are better savored slowly than consumed quickly. They tend to be very flowery and aromatic as opposed to something like a german lager or pilsner which is very clean and crisp.
Tripels tend to be a little bit stronger and a little bit paler that most Belgian beers. When I went into the home brew shop and said I wanted to brew a tripel, the guy gave me a high gravity trappist yeast that he said was pretty high octane stuff. The yeast needs to be really resilient to withstand the alcohol it gives off which, in this case, will be somewhere around 8%-9%. The most important thing is that the final product tastes good. I will be taking copious notes on the entire endeavor that I will share here as I move forward. Wish me luck.
Wednesday, October 6, 2010
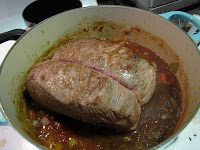
Red Wine Porcini Pot Roast
Sunday morning I poked my nose out from under my comforter. Then I darted it back under. Yup, it was October all right. A chill has set in New York City, the kind that makes the air crisp and makes you think of little else but cider and pumpkins and hayrides. In my chilly apartment, however, it had me thinking about getting warm. The heat is not yet on in our building, so suddenly I had the opposite problem of two months ago, when it was sweltering in my unairconditioned digs. Instead of thinking of dishes that wouldn't utilize the oven at all, I was thinking hard to think of dishes that might warm things up a bit. A dish that would have me turning the oven on and leaving it on. A slow cooked piece of meat that could be served up next to mashed potatoes and warm me all the way down to my toes. It was Pot Roast season.
 The most interesting part of assembling this dish is standing at the meat counter and picking up a four pound chuck roast. There's just something amusing to me about getting a huge cut of meat wrapped in butcher paper, since I'm usually only cooking for two. Cut from the shoulder area above the rib, the chuck roast is tough and fatty, but great for braising. By slow-cooking this otherwise undesirable cut slowly at a lower temperature and steeped in liquid, the tough meat breaks down until it is falling apart. It's juicy, tender, and it creates fantastic gravy.
The next step is to decide what you are going to put into your gravy. Some sort of stock is usually used for the braising, most recommend beef but I've found a rich vegetable stock can work very well. You're going to have plenty of beef flavor when you are done, don't worry. I'm also a huge fan of pouring a cup of red wine in there, which does wonderful things to beef. Wonderful, aromatic things. The pile of vegetables you put in must be carefully selected, because they are going to be in that pot awhile, and will probably turn to mush. There is always the option of adding vegetables some time during cooking, which is known as a "Yankee Pot Roast". Me, I'm a traditionalist. A lazy traditionalist. Once I shut the door of the oven, I'm not really looking to futz with this thing much more. I'll flip the roast and give it a stir at the halfway point, but that's it. Once my roast is in, it's in.
This recipe can be adapted for the crock pot, you just need to throw in another cup or two of stock, since that thing will be cooking for at least 6 hours on high and 8 hours on low. No matter how you cook it, it will make your home smell fantastic, and suddenly you wont be so cold.
The use of tomatoes in this recipe is unusual, as are the porcini mushrooms, but they turn this dish from a peasants dish into a much more sophisticated earthy roast. The juice from the tomatoes mixes with the red wine to create an almost Italian feeling, but the pot roast is still distinctly American. It is simply a more grown up version.
Red Wine Porcini Pot Roast
Adapted from Bon Appetit
Ingredients:
 -1 cup vegetable stock
-1/2 oz dried porcini mushrooms
-1 4-pound boneless chuck roast, tied
-2 tablespoons extra virgin olive oil
-1 large yellow onion, coarsely chopped
-2 celery stalks with some leaves, cut into 1/2-inch thick slices
-1 large carrot, peeled, cut into 1/2-inch thick slices
-3 garlic cloves, smashed
-1 teaspoon fresh thyme, chopped
-1 28-oz can whole peeled tomatoes, drained
-1 cup dry red wine
Directions:
Preheat oven to 300°. Bring broth to a simmer in a small saucepan. Remove from heat; add mushrooms, cover, and let stand until soft, about 15 minutes. Using a slotted spoon, transfer mushrooms to a cutting board. Chop coarsely. Reserve mushrooms and broth separately.
While mushrooms are soaking, sprinkle beef with salt and pepper. Heat oil in a heavy large ovenproof pot over medium-high heat. Add beef and cook until brown on all sides, about 15 minutes total. Transfer beef to a large plate. Pour off all but 1 tablespoon drippings from pot. Place over medium heat, and add onion, celery and carrots. Saute until beginning to brown, about 8 minutes. Add garlic, thyme, and reserved mushrooms, saute 1 minute. Using hands, crush tomatoes, 1 at at time into pot. Cook 3 minutes, stirring frequently, and scraping up browned bits from bottom of pot. Add wine; boil 5 minutes. Add reserved mushroom broth, leaving any sediment behind. Boil 5 minutes.
 Return beef and any juices to pot. Cover; transfer to oven. Cook 1 1/2 hours. (In the meantime you can watch a movie, read a book, and just generally enjoy your warm and nice smelling home.) Turn beef over and continue cooking until tender, about 1 1/2 hours longer. (In the meantime, go back to your book.)
Transfer beef to cutting board; tent with foil. Spoon fat from the surface of the juices in the pot. Bring juices to boil, cook until liquid is reduced to 4 cups, about 7 minutes. Season with salt and pepper.
Cut beef into 1/2 inch-thick slices. Transfer to platter. Spoon juices over and serve!

The gravy turns out as something close to ambrosia. The flavor is deep and rich, and it will soak into mashed potatoes and smothers the now tender meat with deliciousness. It is a truly satisfying and warming meal for chilly and rainy fall days. Will and I ate it up while wearing warm sweaters, and we celebrated the newly arrived fall.

The next step is to decide what you are going to put into your gravy. Some sort of stock is usually used for the braising, most recommend beef but I've found a rich vegetable stock can work very well. You're going to have plenty of beef flavor when you are done, don't worry. I'm also a huge fan of pouring a cup of red wine in there, which does wonderful things to beef. Wonderful, aromatic things. The pile of vegetables you put in must be carefully selected, because they are going to be in that pot awhile, and will probably turn to mush. There is always the option of adding vegetables some time during cooking, which is known as a "Yankee Pot Roast". Me, I'm a traditionalist. A lazy traditionalist. Once I shut the door of the oven, I'm not really looking to futz with this thing much more. I'll flip the roast and give it a stir at the halfway point, but that's it. Once my roast is in, it's in.
This recipe can be adapted for the crock pot, you just need to throw in another cup or two of stock, since that thing will be cooking for at least 6 hours on high and 8 hours on low. No matter how you cook it, it will make your home smell fantastic, and suddenly you wont be so cold.
The use of tomatoes in this recipe is unusual, as are the porcini mushrooms, but they turn this dish from a peasants dish into a much more sophisticated earthy roast. The juice from the tomatoes mixes with the red wine to create an almost Italian feeling, but the pot roast is still distinctly American. It is simply a more grown up version.
Red Wine Porcini Pot Roast
Adapted from Bon Appetit
Ingredients:

-1/2 oz dried porcini mushrooms
-1 4-pound boneless chuck roast, tied
-2 tablespoons extra virgin olive oil
-1 large yellow onion, coarsely chopped
-2 celery stalks with some leaves, cut into 1/2-inch thick slices
-1 large carrot, peeled, cut into 1/2-inch thick slices
-3 garlic cloves, smashed
-1 teaspoon fresh thyme, chopped
-1 28-oz can whole peeled tomatoes, drained
-1 cup dry red wine
Directions:
Preheat oven to 300°. Bring broth to a simmer in a small saucepan. Remove from heat; add mushrooms, cover, and let stand until soft, about 15 minutes. Using a slotted spoon, transfer mushrooms to a cutting board. Chop coarsely. Reserve mushrooms and broth separately.
While mushrooms are soaking, sprinkle beef with salt and pepper. Heat oil in a heavy large ovenproof pot over medium-high heat. Add beef and cook until brown on all sides, about 15 minutes total. Transfer beef to a large plate. Pour off all but 1 tablespoon drippings from pot. Place over medium heat, and add onion, celery and carrots. Saute until beginning to brown, about 8 minutes. Add garlic, thyme, and reserved mushrooms, saute 1 minute. Using hands, crush tomatoes, 1 at at time into pot. Cook 3 minutes, stirring frequently, and scraping up browned bits from bottom of pot. Add wine; boil 5 minutes. Add reserved mushroom broth, leaving any sediment behind. Boil 5 minutes.

Transfer beef to cutting board; tent with foil. Spoon fat from the surface of the juices in the pot. Bring juices to boil, cook until liquid is reduced to 4 cups, about 7 minutes. Season with salt and pepper.
Cut beef into 1/2 inch-thick slices. Transfer to platter. Spoon juices over and serve!

The gravy turns out as something close to ambrosia. The flavor is deep and rich, and it will soak into mashed potatoes and smothers the now tender meat with deliciousness. It is a truly satisfying and warming meal for chilly and rainy fall days. Will and I ate it up while wearing warm sweaters, and we celebrated the newly arrived fall.
Monday, October 4, 2010
Dominating the Airwaves
As many of you may know from the previous post, I was featured on WDEL's lovely Thirsty Thursday segment of The Rick Jensen Show. Gina, a good friend from college, has made herself a staple at WDEL 1150 in Wilmington, DE. About a month and a half ago, she visited our apartment and tried some of my nut brown ale, probably my best beer to date.
 I was buzzed into the studio and met up with Gene, Gina's fiance, who also works at the station. We hung out at his desk and chatted for a while as Gina finished up an interview. I told him that there was an irrational part of my brain that thought I had to use hushed tones in a radio station. Like there were microphones everywhere or something. He told me that he understood...sort of.
 We were almost ready to go. Rick came out and introduced himself. As everyone was setting up, he asked me a couple of questions about where I was from, the beer I liked, stuff like that. We all shuffled into the studio, which forms kind of a semi-circle around the sound board, and took our places at the microphones. I got my beer out and was ready to go.
I brought the same nut brown ale that I mentioned earlier in the blog and distributed it amongst the panel, first in tiny glasses and then when those ran out, styrofoam cups. I'll spare you the details of the show itself and encourage you to listen to the program. Rick was a real pro, by the way. He came off like a guy who feels at home in this kind of setting. The commercial breaks had the same tone as the rest of the show--the panel informally chatting about this and that. (Rick Jensen likes my chucks, by the way.) In the end, my beer got a rating of 5 out of 6 and I got a little round of applause for my trouble. You can't beat that. After the show I packed up my stuff and had to clear out pretty quickly to make room for the next show--a news program of some sort.
When we were done, I was a nerd and asked for a picture with everyone there. I'm just happy that everyone accepted and joined in on my nerd-dom. Gina would be in it but she's the one taking it.

The show was helpful in focusing my attention on brewing again. I've been unable to because my apartment reaches kiln-like temperatures during the summer months, but considering that yesterday was practically jacket weather, I think all systems are go. This coming weekend, I plan to make a stop at the homebrew shop to weigh my options--perhaps something I haven't tried before.
New frontiers are in view. A couple weeks ago, I took a class on all-grain brewing at the Brooklyn Kitchen that got me pretty excited. I like the idea of using as few processed ingredients as possible and making beer from scratch...or at least as from scratch as I can reasonably get. It's going to take some new equipment though, and new equipment is going to mean a monetary investment. Someday though. For now though, extract brewing will have to do. I know Heather is excited that the apartment will not be completely overrun with a ten gallon stockpot and a cooler that's been converted into a mash/lauter tun...yet.
Subscribe to:
Posts (Atom)